Let’s see who connects like that.
Attaching a clasp to a bracelet can seem a bit tricky if you’re new to jewelry-making, but with some patience and the right tools, you can do it easily. In this detailed guide, we’ll walk you through the process step by step, breaking down everything you need to know, so you can confidently attach a clasp to your bracelet.
Whether you’re working with a chain bracelet, a beaded bracelet, or something else, this guide will cover all the bases.
Understanding the Basics
Before we dive into the steps, it’s essential to understand the components involved in attaching a clasp to a bracelet:
Bracelet Material: This could be a chain, a beaded strand, leather, or any other type of material.
Clasp: The clasp is the part that will secure the bracelet around your wrist. There are various types of clasps, including lobster claw clasps, toggle clasps, and magnetic clasps. Choose one that suits your bracelet design and is easy to use.
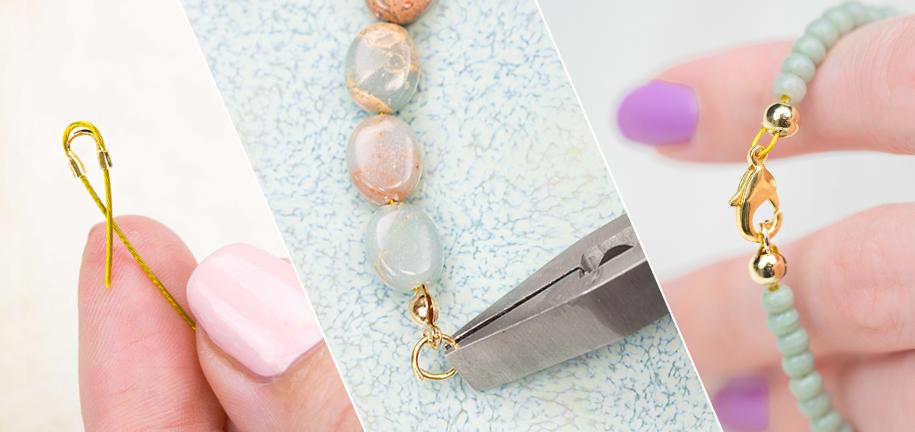
Jump Rings: These are small metal rings that are used to connect the clasp to the bracelet. They’re a crucial component because they create a link between the bracelet and the clasp.
Tools: You’ll need a few basic tools, such as flat-nose pliers, round-nose pliers, and wire cutters (if needed). These tools will help you manipulate the jump rings and attach the clasp securely.
Step-by-Step Guide to Attaching a Clasp
Now that you’re familiar with the basic components, let’s go through the process step by step.
Gather Your Materials and Tools
Start by gathering all the materials and tools you’ll need. Here’s a quick checklist:
- Bracelet material (chain, beads, etc.)
- Clasp (of your choice)
- Jump rings (usually two are needed)
- Flat-nose pliers
- Round-nose pliers
- Wire cutters (optional)
- Crimp beads (if you’re working with a beaded bracelet)
Make sure you have a clean, flat workspace where you can lay out your materials and work comfortably.
Prepare the Bracelet
Depending on the type of bracelet you’re working with, you’ll need to prepare it before attaching the clasp.
For a Chain Bracelet: Measure the chain to the desired length for your wrist. Keep in mind that adding the clasp will increase the total length slightly, so adjust accordingly. Use wire cutters to trim the chain if necessary.
For a Beaded Bracelet: Finish stringing the beads onto the wire or string. Leave a small amount of extra wire at each end to attach the clasp later.
Open a Jump Ring
Jump rings are small, circular metal rings that have a small gap. This gap allows you to open and close the ring, which is how you’ll attach it to your bracelet and clasp.
- Hold the jump ring with your flat-nose pliers on one side of the gap.
- Use your round-nose pliers to grip the other side of the gap.
- Twist the jump ring open by moving one side of the ring away from you while keeping the other side stationary. This motion keeps the ring’s shape intact. Don’t pull the jump ring apart sideways, as this can distort the ring and make it difficult to close properly.
Attach the Clasp to the Bracelet
Now that your jump ring is open, it’s time to attach the clasp.
For a Chain Bracelet: Slide the last link of the chain onto the open jump ring. Then, slide one end of the clasp onto the same jump ring.
For a Beaded Bracelet: If you’re using crimp beads, thread the wire through the crimp bead first, then through the loop on the clasp, and back through the crimp bead. Use your pliers to squeeze the crimp bead tightly, securing the wire and clasp together.
Once the clasp is attached to the jump ring, use your pliers to close the jump ring. Twist it back into its original position, ensuring that the ends of the ring meet evenly and there’s no gap.
Secure the Other End of the Bracelet
With one end of the clasp attached, repeat the process on the other end of the bracelet.
- Open another jump ring using the same twisting method.
- Attach the other part of the clasp (if your clasp has two parts, like a toggle clasp or a lobster claw clasp with a jump ring).
- If you’re attaching the clasp directly to a jump ring on a chain bracelet, slide the last link of the chain onto the jump ring before closing it.
Once everything is in place, close the jump ring using your pliers, just like you did before.
Finish the Bracelet
At this point, your clasp should be securely attached to both ends of the bracelet. However, there are a few final steps to ensure everything is perfect.
Check the Connections: Gently tug on the clasp and the bracelet to make sure the jump rings are secure. If anything feels loose, reopen the jump ring and reclose it, ensuring the ends meet perfectly.
Trim Excess Wire: If you’re working with a beaded bracelet, use wire cutters to trim any excess wire near the crimp beads. Be careful not to cut too close to the bead, as you don’t want the wire to slip out.
Test the Bracelet
Before considering the bracelet finished, test it out to ensure it fits properly and the clasp functions correctly.
Fit: Try the bracelet on to see if it fits comfortably around your wrist. The clasp should close securely without being too tight or too loose.
Function: Open and close the clasp several times to make sure it operates smoothly. If it’s difficult to open or close, consider adjusting the jump rings or replacing the clasp with a different style.
Troubleshooting Common Issues
Sometimes, things don’t go perfectly the first time. Here are a few common issues and how to fix them:
Loose Jump Rings: If the jump rings don’t close properly, they might be too thin or weak. Try using thicker, more durable jump rings.
Clasp Doesn’t Stay Closed: If the clasp keeps opening, it might not be the right style for your bracelet. Consider using a more secure clasp like a lobster claw or a magnetic clasp.
Bracelet Too Long/Short: If the bracelet doesn’t fit perfectly, adjust the length by removing or adding links or beads. You can also add an extender chain if needed.
Optional: Adding Decorative Elements
If you want to add a personal touch to your bracelet, consider attaching decorative elements like charms or beads.
Adding Charms: Open a jump ring, attach the charm, and then attach it to the bracelet before closing the jump ring.
Beads: If you want to add beads near the clasp, string them onto the wire before attaching the crimp bead and clasp.
These decorative elements can make your bracelet unique and add a special touch to your jewelry piece.
Conclusion
Attaching a clasp to a bracelet may seem daunting at first, but by following these detailed steps, you can do it with confidence. Whether you’re making a bracelet from scratch or repairing an existing one, understanding how to securely attach a clasp is a valuable skill in jewelry-making.
With practice, you’ll become more comfortable with the process, and soon you’ll be able to create beautiful, custom bracelets for yourself or as gifts for others. Remember, the key is to take your time, be patient, and enjoy the creative process!